Latest Posts

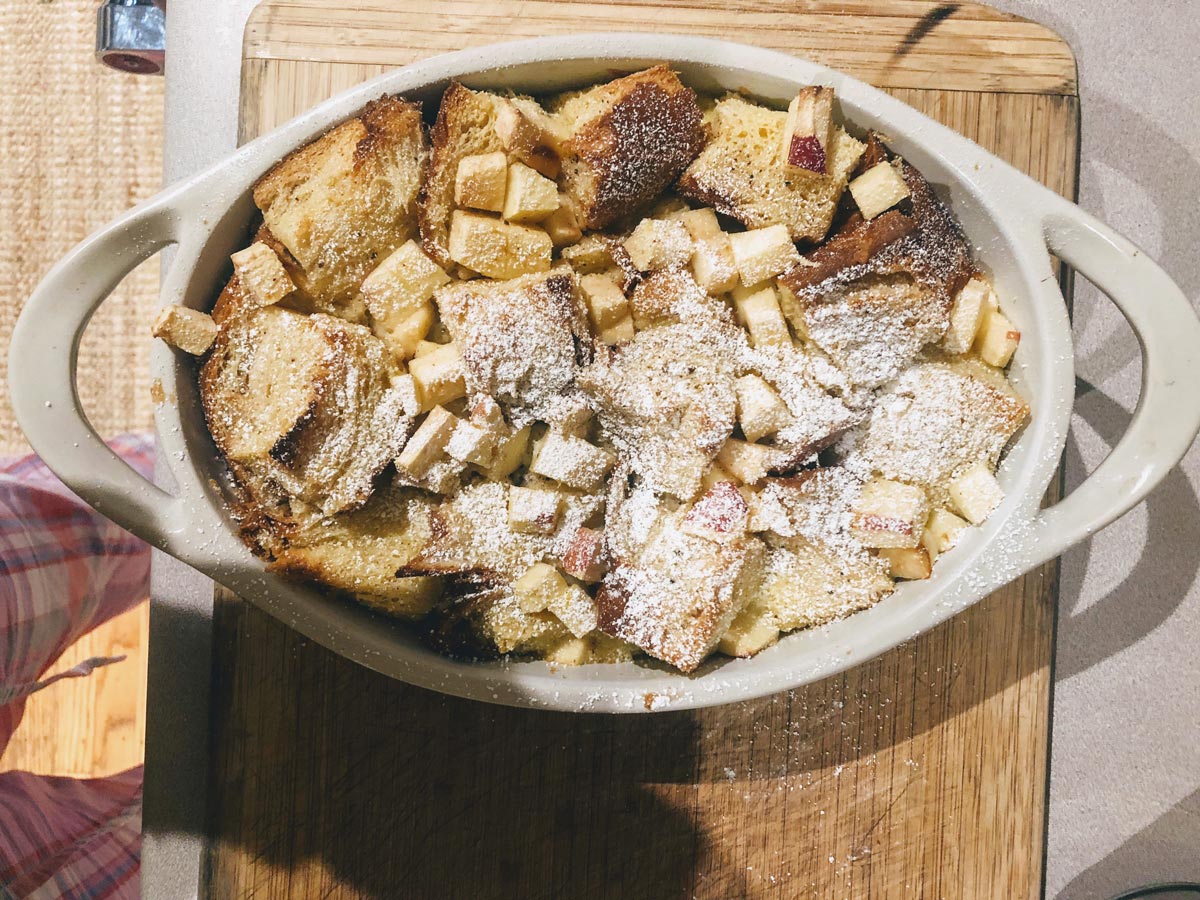
a baking dish with bread pudding

simple bread pudding with apples and cinnamon

Happy Earth Day! I’m baking again. Well, we’ve been baking since March 24. It’s hard to believe that our new stove was delivered almost a month ago, right in time for Patrick’s birthday, which was great. I was even able to bake a birthday cake, with the only problem that the delivery and installation pushed all our cooking plans late into the evening, so there were no good photos of the cake.

Okay, the other problem was that my frosting didn’t turn out very pretty. So I didn’t think my first cake in our new oven was blog-worthy. It was tasty, though! Patrick had asked for a lemony dessert, so I made a four-tier mini cake filled with lots of lemon cream. 

a gas stove

Since then, we’ve been trying to stay away from eating too many sweets in an effort to get in better shape, so it’s been a bit quiet in the baking department. We are also trying to resume our family hikes on Sundays. We started the tradition some time ago, but haven’t been very consistent.

Last weekend, we managed to go on a hike in the City with the kids along the Pacific Coast Trail. We started at Lands End, near one of our all-time favorite restaurants, Cliff House, which closed down due to Covid, unfortunately. 

The views of the ocean were superb, and the wildflowers on the path looked kind of tropical. It felt a little like Costa Rica. Everything was so green. Very pretty, and we definitely got a workout. 

View of the Pacific Ocean

Today I decided it was time to put the oven back to work, by finally trying out the Simple Bread Pudding I’ve had bookmarked on my online recipe box for months.

Growing up, our housekeeper, Ana, used to make one of the simplest bread puddings I’ve ever known. Hers was a “no-recipe recipe,” as @samsifton would say. You took leftover sandwich bread, butter, milk, eggs, and vanilla and swirled them together in the blender for a second, poured the mixture into a pan, and stuck it in the oven; super easy, and while warm, pretty tasty! However, after the pudding cooled down, it wasn’t the prettiest looking dessert. It became a dense, beige, slab of dough — not that it tasted bad, it just didn’t look very appetizing. So, whenever I see bread pudding recipe photos like this one, I make sure to save them. 

Today, I finally made Matt Bittman’s recipe, which I’ve had my eye on for quite some time. I followed his advice and made some modifications right away. I’ve learned that bread pudding recipes are very forgiving. Trust me, I’ve been making Ana’s bread pudding my whole life, and I’ve never had to toss any of it out.

The recipe called for vanilla extract, but I had real vanilla beans in the cupboard, so of course, I used one of those. I also used less butter and swapped out some of the milk for heavy cream. My first impulse was to make this an orange-flavored pudding, but all I had in the house were apples. So, I chopped one into tiny cubes and added it to the bread with a tad of cinnamon. I thought adding the apple would make it more like real breakfast and less like dessert. After all, it was six in the morning when I started baking. I was hoping the kids would eat a little piece before heading off to school.

Challah Bread and a knife on a cutting board.

The pudding came out super close to the picture, which was exactly what I wanted. The bread cubes still recognizable, just custardy enough to pass as pudding. I was careful to pour the milk and egg mixture very slowly over the bread so that every inch was fully covered but not swimming in liquid. The apple pieces remained a bit firm, which was a nice contrast to the custard.

bread pudding

As I was dusting the top of the pudding with a little confectioner’s sugar to give it the final touch, my 15-year-old son walked into the kitchen, ready to eat some breakfast. I asked him if he wanted to try my delicious bread pudding that had just come out of the oven. He stopped to look at me, removed one of his earbuds (headphones have become part of his being), looked at the pudding, and looked at me again, and said in his best teenage tone, “Why are you making Christmas dinner?” (He hadn’t heard a word I’d said and thought it was turkey stuffing.) He put the earbud back into his ear and continued to walk past me carrying a box of Crispix and milk to the table.

I asked my daughter if she wanted a little piece before heading out. From her room, I heard a faint, “Sure! Be there in a bit!” Minutes later, the two of them were gone, and it was suddenly just me in the kitchen, staring at an intact dish full of apple bread pudding.

I hope you have a nice day celebrating Earth Day. I will be enjoying a piece of bread pudding with a nice cup of coffee before it gets cold and watering my plants which are in need of some TLC. 

Simple Bread Pudding with Apples and Cinnamon

(Good enough for hosting brunch)

Ingredients:

1 cup milk
1 cup heavy cream
1 tablespoon (1/8 stick) butter, more for greasing pan
1 vanilla bean
⅓ cup sugar
Pinch of salt
2 eggs, beaten
½ loaf challah bread, cut into 2-inch cubes (or pan dulce)
1 apple cut into small dice
1/2 tsp cinnamon
Confectioners’ sugar for decoration

Steps

  • Heat the oven to 350 F. In a small saucepan over low heat, warm the milk, cream, butter, vanilla bean, sugar, and salt. Continue cooking just until the butter melts.
  • Butter a 2-quart baking dish and add the cubed bread.
  • Whisk the eggs and add them to the milk mixture. (Add a little bit of the warm milk mixture to the eggs to temper them before combining them with the rest of the milk.)
  • Slowly, pour the custard over the bread making sure to cover every cube. (Take your time.)
  • Cut the apple into small dice and mix with the cinnamon. Sprinkle on top of the bread mixture. (You can pre-cook the apples in a pan with a small amount of butter to make them softer.)
  • Bake for 35 minutes, or until custard sets and the edges of the bread turn a nice golden brown. Right before serving, sprinkle with confectioners sugar.
  • This dish is best served warm, but also good at room temperature.
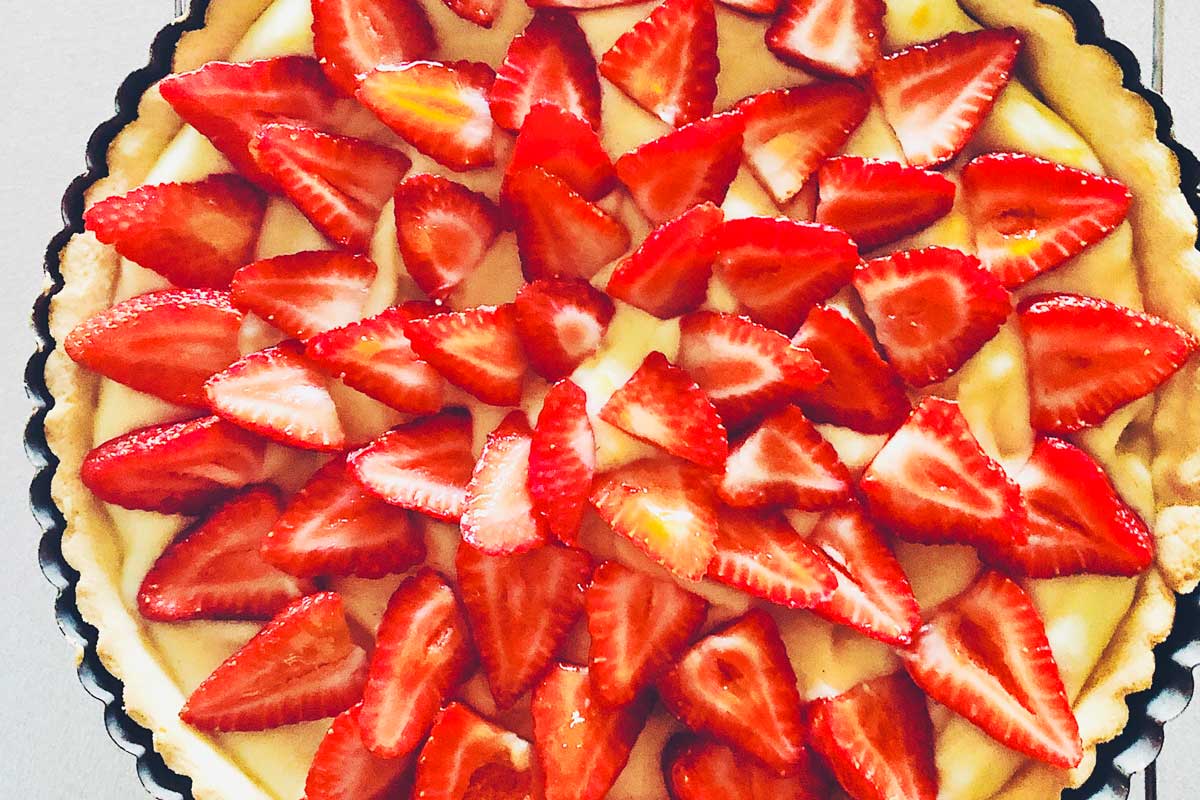
a strawberry tart

baking a strawberry tart for Sarah

It was Sarah’s birthday last week and as usual, she requested a fruit tart instead of a cake. In Marin, you can find strawberries pretty much year-round. Most come from Mexico, but already this week local strawberries are starting to show up in the market, and surprisingly, they are delicious – so sweet! I wish I had bought more. It seems like every time I make a tart I don’t have enough fruit to cover all the custard, but Sarah didn’t seem to mind.

Happy kid, happy mom, right?

Fruit Tart Recipe

Tart dough recipe slightly adapted from my favorite book: Tartine Bakery Cookbook
Pastry cream filling
Fruit(s) of choice
Jam/jelly for glazing the fruit

For the Tart Shell

  • 1 cup + 2 tbsp unsalted butter
  • 1 cup sugar
  • 1/4 tsp salt
  • 2 large eggs 
  • 3 1/2 cups all-purpose flour

Make sure the eggs and butter are at room temperature.

Combine the butter, sugar, and salt in the bowl of a stand mixer. Use the paddle attachment and mix until smooth. Add the eggs, one at a time, until everything looks smooth. 

Add the flour all at once to the butter mixture. Blend at slow speed until just combined. (Do not overmix!)

On a lightly floured surface, divide the dough into four equal parts and roll out into 1/2-inch thick disks. Wrap each disk with plastic wrap and place them in the refrigerator to chill for about 2 hours or overnight.

When you are ready to make the tart, roll out the dough into a circle about 1/8 inch thick and about 1 inch larger than the tart pan you plan on using. You can make mini tarts or one big one. Place the dough into your pan and prick the bottom before inserting it into a 325 F oven. A 9-inch tart should be ready in about 8-10 minutes and should be a light golden color. Smaller tarts should take about 5-7 minutes.

Let the tart shell cool completely before filling it.

For the pastry cream 
(makes about 1 2/3 cups)

  • 1/3 cup sugar
  • 1/8 teaspoon salt
  • 2 tablespoons cornstarch
  • 1 1/2 cups milk
  • 3 egg yolks, slightly beaten
  • 3/4 teaspoon vanilla extract

In a small saucepan, mix sugar, salt, and cornstarch. Stir in milk.

Cook, stirring constantly, on medium heat until mixture thickens and begins to boil; boil one minute and remove from heat.

Temper the egg yolks by adding a little of the hot milk mixture to them while whisking. Return to pan.

Cook, stirring constantly until the mixture is thick and bubbly. Remove from the heat.

Stir in vanilla extract. (If you love almond extract you can use 1/2 tsp. instead.) Pour into a medium bowl through a sieve to remove any lumps.

Let cool at room temperature for about 30 min. Cover with plastic wrap placed directly on the surface of the cream. 

Store the cream in the refrigerator until it’s time to assemble the tart.

To serve
Wash and slice 2 cups of strawberries or a mix of your favorite fruit. Some ideas: kiwi, pineapple, raspberries, blueberries, or honeydew melon.

Arrange the fruit on top of the cream and brush each berry with a little jam/jelly. Heat jam/jelly up in the stovetop/microwave to make it easier to apply. (I used apricot jam).

Enjoy!

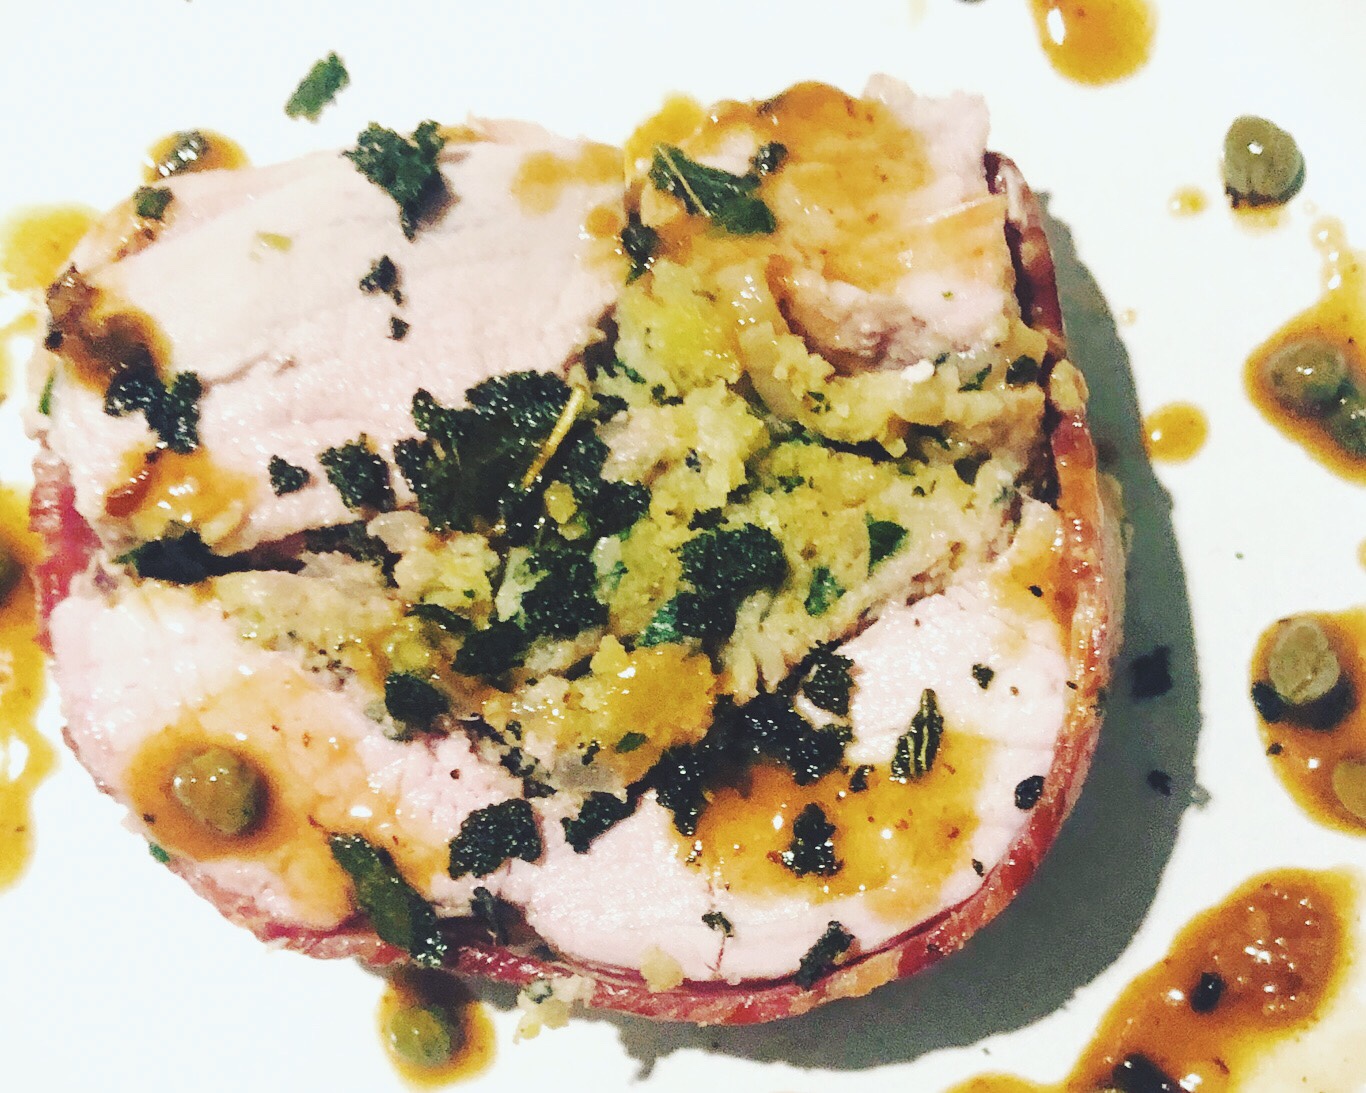
pork with sage and capers

We’re finally having some beautiful spring days in Marin, so this weekend we decided to go for a hike around Bon Tempe, one of the nearby lakes.

Bon Tempe Lake, 2021

“Back in the day,” as Patrick likes to say, hiking was one of our favorite weekend activities.

Looking a bit goofy in our hiking garb🤭. Kennedy Meadows, CA, 2000?

Especially when we lived in Salt Lake City, we made an effort to hike as often as we could. The views from the top of the Wasatch Mountains were spectacular, but Marin has a lot to offer as well!

Hiking the Wasatch Mountains in Utah

I have several books with Marin trail information. I am not kidding that we could hike a different trail each weekend until we are too old to hike and never run out of options.

Bon Tempe Lake, 2021

Both Patrick and I are ready to tackle the pounds we gained last year, and hiking is the perfect way to ease back into exercising more. And with these views and weather, who can complain!? Plus, it’s fun to hike together like we used to.

Today, I am sharing a recipe we cooked this week. This recipe has some of my favorite flavors: lemon, capers, and bacon. We don’t often buy sage, but there was some in the fridge from another recipe, and I wanted to find a way to use it up.

I remembered we’d made this recipe some time ago and that I had really liked it. I could not remember which book it was from, but I finally found it: “The Essential Mediterranean Cookbook.” I love this book. I’ve made churros and Sicilian cannoli from it, and it has my favorite homemade pasta recipe. Let me know if you try this.

Pork Tenderloin with Sage and Capers

adapted from The Mediterranean Cookbook

1/4 cup extra virgin olive oil
2 tablespoons unsalted butter
1 small yellow onion finely chopped
1/2 cup plain Panko/bread crumbs
2 teaspoons chopped fresh sage
1 tablespoon chopped fresh Italian parsley
1 tablespoon grated lemon zest (from one lemon)
2 1/2 tablespoons salted baby capers
1 egg
2 large pork tenderloins
10 thin slices of bacon
2 teaspoons flour
1/3 cup white wine
1 1/4 cups chicken stock
8 whole sage leaves (garnish)

  1. Preheat the oven to 325º F.
  2. In a medium-sized pan, heat one tablespoon olive oil and 1 tablespoon butter.
  3. Add the onion. Cook for about 5 minutes or until lightly golden.
  4. In a separate bowl, combine the breadcrumbs, sage, parsley, lemon zest and capers, and onions with the egg. Season with salt and pepper.
  5. Butterfly each pork tenderloin. Spread the stuffing down the length of one and cover with the other one.
  6. Wrap the bacon slices over the two filets and tuck underneath to hold the filling inside.
  7. Carefully, move the meat to a cookie sheet. Drizzle with olive oil.
  8. Bake for one hour, or until juices run clear after inserting a skewer in the thickest part.
  9. Remove the meat from the baking sheet, place it on a plate, and tent with foil.
  10. Make a quick sauce with the drippings left in the pan on your stovetop by adding 2 tsp. flour to the pan. Stir well and add the wine. Allow to bubble for one minute. Add the chicken stock and stir well to remove any lumps. Simmer for about 5 minutes and add the remaining capers. (If you cannot fit your pan on top of your stove, simply pour all the drippings into a saucepan and follow the same instructions.)
  11. In a separate pan, heat the remaining oil and fry the sage leaves until crisp. Drain the leaves in some paper towels.
  12. To serve, slice the pork into 1/2-inch slices; spoon sauce, and a little of the fried sage leaves on top.

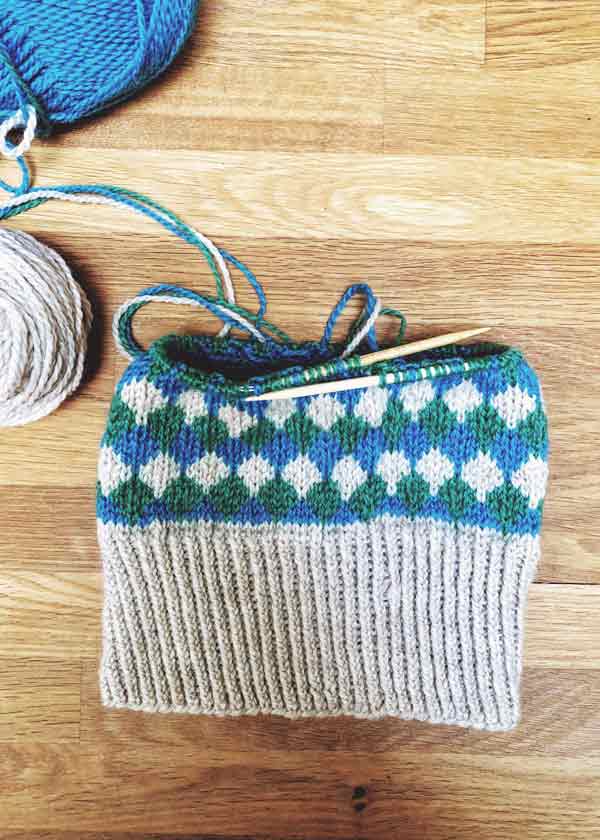
knitting the diamond hat, a free pattern by anne mizoguchi

One of the first knitting projects I finished this year is the Diamond Hat, a pattern you can download for free on the Ravelry website. This was a good project to practice my colorwork technique and tension (both still a work in progress).

Surprisingly, I was able to finish it super quickly, which makes it a great gift idea. One thing I noticed was that my ribbing was slanting to the left a bit. Do you see it? The ribbing is not a typical knit one, purl one. Instead, you knit the ‘knits’ through the back loops, which makes the rib be more defined. I liked the resulting rib, but the slanting edge was bugging me.

That’s why I decided to block the hat. Blocking sounds scary to new knitters, but actually, it’s a pretty easy process. You need a bucket, warm water, wool soap (or baby shampoo), and a few clean towels.

  1. Fill a bucket with warm water (you could also use your tub or clean sink) and add a drop of wool soap or baby shampoo to the water. (I used baby shampoo).
  2. Put the hat in the bucket and let it soak up the water so it sinks to the bottom.
  3. Gently, swirl the hat around in the water. Just be careful not to squeeze the fabric, because that could felt the wool.
  4. Rinse the soap out of the hat by pouring out the soapy water and filling the bucket with fresh water a couple of times. Swirl the hat in the fresh water to remove the soap.
  5. Take the hat out of the bucket and place it between two dry towels. Roll the hat and towels up together to remove the excess water. You can step over the roll to help get the most water out.
  6. Finally, lay the hat flat on a dry towel and let it dry. You can give the hat an occasional twirl to avoid a sharp crease. Some people dry hats on a small balloon for this reason.

This pattern is easy to follow, and you can have a lot of fun experimenting with different color combinations, something I’ve been thinking about lately.

knitted hat

If you are just getting started with colorwork, this is a great pattern to practice your skills. As a bonus, the floats are not too long, so if you don’t know how to catch floats yet, you can probably skip that, and your hat will turn out great.

I think I’d like to make another one of these hats and have some ideas for a few modifications, including extending the ribbing so that it covers my ears all the way when folded, and experimenting with an Italian cast-on, which I think looks super pro.